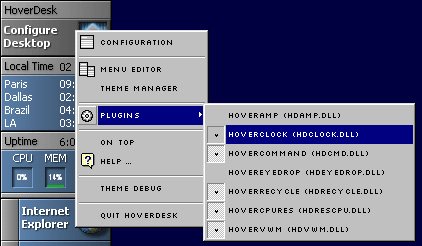
About Plug-ins:
Plug-ins are "modules" that are like "mini programs" You can enable or disable any installed plug-ins by right clicking the main tile and selecting Plugins. Check or uncheck the plug-ins you wish to use.
The plug-ins shown here are the ones that are included with the HoverDesk application. You may download additional plug-ins from the HoverDesk Plug in page.

All the plugins can be placed anyywhere on the Desktop and snapped to groups with the SHIFT Key.
Recycle Bin plugin :
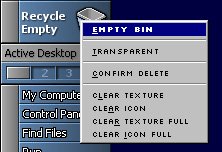
Left Click will bring the default recycle
bin menu, Right Click will bring the plugin menu.
To change the Empty texture/icon of the plug, hold
the SHIFT key and drop a BMP/ICO on it. Hold
the CRTL key and drop a BMP/ICO to change the Full image.
Clock Plugin :
A handy day/date/time display with an optional World Time Zone display feature. You can specify any number of time zones you wish. You must edit the Modules.ini file to include the names and GMT time zone information. What are GMT Time zones?
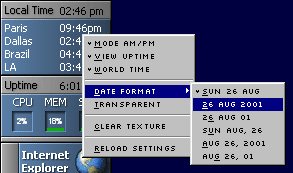
Double click will bring the Windows Date/Time control panel. Right
click will show the plug-in options menu.
To assign the 2 different textures on this plugin: Drop a BMP file onto this plugin in each separate mode ( Normal / WorldTime )
Customizing the colors of the
Time/Calendar fonts :
Customizing the World Time Zone parameters:
Open the file Modules.ini in your theme folder, then modify the lines
below :
[HDCLOCK]
texture = clock.bmp (image name for standard clock)
worldbmp = WTclock.bmp (image name for WorldTime clock)
ampm = 1 (entry created by right-click options - do not edit)
worldtime = 1 (entry created by right-click options - do not
edit)
UpTime = 1 (entry created by right-click options - do not
edit)
DateFntName = Tahoma (Font Name for Date display)
DateFntSize = 8 (Font Size for Date display)
DateColor = 0,0,0 (Font Color (RGB) for Date display)
DateOfX = 100 (Time text offset from left)
DateOfY = 100 (Time text offset from top)
UPFntName = Tahoma (Font Name for Uptime display)
UPFntSize = 8 (Font Size for Uptime display)
UPFntColor = 0,0,0 (Font Color (RGB) for Uptime display)
UpTimeOfX = 60 (Uptime text offset from left)
UpTimeOfY = 79 (Uptime text offset from top)
TimeFntName = Tahoma (Font Name for Time display)
TimeFntSize = 8 (Font Name for Time display)
TimeColor = 0,0,0 (Font Color (RGB) for Time display)
TimeOfX = 60 (Time text offset from left)
TimeOfY = 4 (Time text offset from top)
wtfntname = Tahoma (Font Name for World Time display)
wtfntsize = 8 (Font Size for World Time display)
wtfntcolor = 255,255,255 (Font Color (RGB) for World Time display)
wtofsx = 5 (TimeZone Name text offset from left)
wtofsy = 21 (TimeZone Name text offset from top)
wtofsxtime = 60 (TimeZone Time text offset from left)
wtCity = Paris,Dallas,Brazil,LA (TimeZones can be named
anything you desire)
wtGMT = +1,-6,-4,-5 (GMT factors)
DateFormat = 0 (entry created by right-click options - do not
edit)
trans = 0 (entry created by right-click options - do not edit)
Virtual Desktop or VWM (4 desktops) :
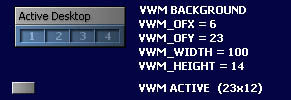
Left click to change the active screen. To change the texture, drop a BMP file on the plugin. You may create a custom bitmap to be displayed over the active screen. A default Highlight effect is applied if this bitmap is not specified. To change the active bitmap, SHIFT+Drag a BMP file onto the plug-in.
Right click will bring the plugin menu. You
may enable transparency if the texture image contains transparent areas, Select alternate
layouts for the VWM (2x2, 4x1Horiz, 1x4Vert). Theme creators should include alternate VWM
images for each configuration.
Open the file Modules.ini in your theme folder, then modify the lines below :
[HDVWM]
texture=VWM.bmp (image name for VWM background))
active=VWM Selected.bmp (image name for Hilighted graphic)
VWM_OfX=17 (Active area of VWM offset from left)
VWM_OfY=16 (Active area of VWM offset from top)
VWM_WIDTH=100 (Active area Width of VWM)
VWM_HEIGHT=9 (Active area Height of VWM)
VWMMode=1 (entry created by right-click options - do not
edit)
trans=0 (entry created by
right-click options - do not edit)
CPU Monitor :

Right click will bring the plugin menu. Double
click to swap between CPU / MEM / SWP monitor. Place the mouse over the plug to
show the tooltips with CPU % values. To change the texture, drop a BMP file on the plugin.
NOTE: You may view more than one
statistic at a time, check which items you wish to view.
Customizing the colors of the Graph / Bars :
Open the file Modules.ini in your theme folder, then modify the lines below :
[HDCPURES]
fntname = small (Font Name for percentage display)
fntsize = 6 (Font Size for percentage display)
start = 7 (Minimum displayable percentage)
percent = 1 (entry created by right-click options - do not edit)
fast = 0 (entry created by right-click options - do not edit)
trans = 0 (entry created by right-click options - do not edit)
CPUStartColor = 0,188,0 (RGB color for CPU indicator)
CPUEndColor = 255,0,0 (RGB color for CPU indicator)
cpuX = 14 (CPU display area Upper Left coordinates)
cpuY = 18 (CPU display area Lower Right coordinates)
cpuW = 17 (CPU display area Width)
cpuH = 18 (CPU display area Height)
vertCPU = 1 (entry created by right-click options - do not
edit)
MEMStartColor = 0,188,0 (RGB color for Memory indicator)
MEMEndColor = 255,0,0 (RGB color for Memory indicator)
memX = 47 (MEM display area Upper Left coordinates)
memY = 18 (MEM display area Lower Right coordinates)
memW = 17 (MEM display area Width)
memH = 18 (MEM display area Height)
vertMEM = 1 (entry created by right-click options - do not
edit)
SWPStartColor = 0,188,0 (RGB color for Swap indicator)
SWPEndColor = 255,0,0 (RGB color for Swap indicator)
swpX = 81 (Swap display area Upper Left coordinates)
swpY = 18 (Swap display area Lower Right coordinates)
swpW = 17 (Swap display area Width)
swpH = 18 (Swap display area Height)
vertSWP = 1 (entry created by right-click options - do not edit)
GRAFStartColor = 0,188,0 (RGB color for Graphic CPU useage
indicator)
GRAFEndColor = 255,0,0 (RGB color for Graphic CPU useage
indicator)
grfX = 2 Graph display area Upper Left coordinates)
grfY = 35 (Graph display area Lower Right coordinates)
grfW = 61 (Graph display area Width)
grfH = 28 (Graph display area Height)
unfilledGRAF = 0 (entry created by right-click options - do not
edit)
PercentColor = 255,255,255 (RGB color forpercentage text)
texture = cpu.bmp (Image name for Module background image)
Command Line :

Customizing the Command Line:
Open the file Modules.ini in your theme folder, then modify the lines below :
[HDCMD]
arrowbmp = arrow_command.bmp (Image name for Drop Down Arrow
image)
posx = 6 (Command text offset from left)
posy = 26 (Command text offset from top)
cmdwidth = 188 (Command text maximum length in pixels)
CMDColor = 105,105,105 (RGB color for Command text
background)
BorderColor = 0,0,0 (RGB color for Border)
FntColor = 0,0,0 (RGB color for Command text)
trans = 0 (entry created by right-click options - do not edit)
texture = commandline.bmp (Image name for Module
background image)
EyeDropper : Not
Included - available at the HoverDesk Plug in page.
Refer to the instructions included with the plug-in for configuration details.
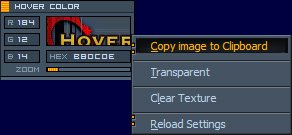
Hold the Left mouse button on the plugin, then move your mouse over the Desktop and it will capture the part of the screen below your mouse cursor, and display the color value.
Right-Click on plug will bring the Plug menu (Zoom / Copy ) Double click on it will swap between RGB / HEX values NOTE: you can specify manually the values in the R / G / B fields. To change the texture, drop a BMP file on the plugin.
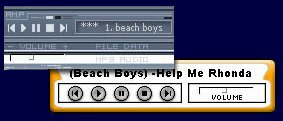
Winamp Controller: Not
Included - available at the HoverDesk Plug in page.
Refer to the instructions included with the plug-in for configuration details.
HoverNews: Not
Included - available at the HoverDesk Plug in page.
Refer to the instructions included with the plug-in for configuration details.
